Modifying the Appearance of Paragraphs
One of the most common modifications for online output is changing the appearance of text. Using Style Designer, you can select a paragraph style and then define the appearance of that style. This efficient method allows you to globally change all paragraphs with the same style at once, which increases your control and reduces maintenance costs.
The Prototype Style for Paragraphs
The Prototype style is the parent to all other styles. When you set a property for the Prototype paragraph style, other paragraph styles inherit the value of that property. You can then override that value for specific styles as needed. The Prototype paragraph style allows you to quickly change a default property and apply that change to all paragraph styles within your Stationery project.
Depending on how you organized your styles in Style Designer, you may not have one style as the parent style on which all others are based. In Microsoft Word, usually all styles are based on Normal, but that may not always be the case. The Prototype style ensures that each of your styles has a parent style within your Stationery project.
Setting the Background Color of a Paragraph
In terms of the CSS box model, the background for a paragraph refers to the background of the content and the padding areas. If you increase the padding for a paragraph style, the background color area for that style also increases. If you decrease the padding for a paragraph style, the background color area for that style also decreases.
To set the background color of a paragraph
- Open your Stationery design project.
- On the View menu, click Style Designer.
- In Paragraph Styles, select the style you want to modify.
- On the Properties tab, click Background.
- In the Color field, select a color from the drop-down menu, or type the RGB value of the color you want, such as
#FFFFFF.
Setting the Border Style and Color of a Paragraph
Borders are lines that can be drawn around any or all of the four sides of a paragraph. In terms of the CSS box model, increasing the padding for a paragraph style increases the space between the paragraph and the border.
Not all browsers display border styles the same way. For example, some browsers may not differentiate dotted lines from solid lines. The size and spacing of the dots in a dotted line may also be different between various browsers and operating systems.
To set the border style and color of a paragraph
- Open your Stationery design project.
- On the View menu, click Style Designer.
- In Paragraph Styles, select the style you want to modify.
- On the Properties tab, click Border.
- Click the tab for the side of the paragraph you want to display a border, and then specify the color, style, and width for that border. For more information about a property, click Help.
Setting the Font for a Paragraph
Setting fonts for online output is an important step in making sure your content is properly displayed for your audience. Because many browsers and help systems use only the fonts available on the user's computer, you may not be able to use specific fonts, such as Times New Roman, as some computers may not have those fonts installed. You can specify a font family, such as sans-serif, to ensure a font of a similar type is used on each computer. You can also specify multiple fonts, separated by commas, to allow the browser to display the first available font.
To set the font of a paragraph
- Open your Stationery design project.
- On the View menu, click Style Designer.
- In Paragraph Styles, select the style you want to modify.
- On the Properties tab, click Font.
- Specify the family, size, style, and other properties you want to modify. For more information about a property, click Help.
Setting the Width, Height, and Positioning of a Paragraph
In regards to the CSS box model, modifying the width and height of a paragraph adjusts the content box, which essentially defines the space that the paragraph uses. For example, if an existing paragraph stretches across the entire page, but you then adjust the width to 200 px, the paragraph is then limited to only 200 pixels wide.
To set the width, height, and positioning of a paragraph
- Open your Stationery design project.
- On the View menu, click Style Designer.
- In Paragraph Styles, select the style you want to modify.
- On the Properties tab, click HTML.
- Specify the appropriate values for the width, height, and positioning properties. For more information about a property, click Help.
Adjusting the Space Around a Paragraph
You can adjust the white space around a paragraph by adjusting the margin and the padding. In terms of the CSS box model, modifying the padding property adjusts the space inside the border area. For example, if you create a border or background color for a paragraph and you increase the size of the padding, the border moves away from the text in the paragraph.
Modifying the margin properties adjusts the space outside the border area. For example, if you create a border or background color for a paragraph and you increase the size of the margins around the paragraph, the border remains the same distance from the text in the paragraph. However, the position of the paragraph changes since there is more white space between the modified paragraph and the other elements on the page. Review the following additional considerations:
- Set the right margin on paragraph styles to provide spacing between the text and the right edge of the window.
- For paragraphs used within bulleted and numbered lists, carefully adjust the left margin to correctly align with the text of the bulleted and numbered list items. Those list items may have different left margins to leave space for the bullet or number. For more information, see Defining the Appearance of Bulleted Lists and Defining the Appearance of Numbered Lists.
- When defining the left margin for a paragraph style used in a table, consider the size and weight of the font as well. For example, bold table headings need less pixels in their left margin than non-bold table text paragraphs so that both types of text align with each other.
To set the margin and padding of a paragraph
- Open your Stationery design project.
- On the View menu, click Style Designer.
- In Paragraph Styles, select the style you want to modify.
- On the Properties tab, click Margin.
- Specify a value and select the unit of measure for the Left, Right, Top, and Bottom margin properties.
- On the Properties tab, click Padding.
- Specify a value and select the unit of measure for the Left, Right, Top, and Bottom padding properties.
Setting the Text Color and Other Characteristics of a Paragraph
In general, ePublisher generates output based on the properties of the content from the original source documents. You can modify the appearance of your online content without modifying your source documents. The text properties allow you to modify several important characteristics of the text:
- Color
- Kerning between letters and words
- Space between lines of a paragraph, also known as letting or line height
- Underlining, overlining, and strikethrough text
- Horizontal and vertical alignment of a paragraph
- Indentation of a paragraph
To set the text characteristics of a paragraph
- Open your Stationery design project.
- On the View menu, click Style Designer.
- In Paragraph Styles, select the style you want to modify.
- On the Properties tab, click Text.
- Specify the appropriate values for the text-related properties, such as Color and Line height. For more information about a property, click Help.
Modifying Paragraphs for Bidirectional Languages
In some documents, such as those written with Arabic or Hebrew script, and in some mixed-language contexts, text within a single paragraph may appear with mixed directionality. For example, some characters are read from left to right, while others within the paragraph may be read from right to left. This phenomenon is called bidirectionality, or bidi for short.
If a document contains right-to-left characters, and if the browser is able to display the language with the proper character set, the browser must apply the bidirectional algorithm. The proper character set means to not display arbitrary substitutes such as a question mark, a hex code, or a black box for some characters.
ePublisher allows you to make sure the browser correctly displays the content by offering the Unicode Direction and Unicode Bidi (bidirectional) properties.
To set the Unicode properties of a paragraph
- Open your Stationery design project.
- On the View menu, click Style Designer.
- In Paragraph Styles, select the style you want to modify.
- On the Properties tab, click Text.
- Under Unicode, set the appropriate values for the Direction and Unicode Bidi properties. For more information about these properties, click Help.
Disabling Autonumbering in Output
In your source documents, you may have autonumbering enabled for print delivery purposes, such as printed manuals and PDFs. This function allows you to add autogenerated numbers to your chapters, headings, and figure captions. However, for some online delivery, you may not want to include the autonumbering in your online help.
To disable autonumbering
- Open your Stationery design project.
- On the View menu, click Style Designer.
- On the Project menu, click a target in the Active Target menu option that is an output format that supports this option.
- In Paragraph Styles, select the style that has the autonumbering.
- On the Options tab, set the Keep paragraph numbering option to Disabled.
- Repeat steps 4-5 for every paragraph style for which you want to disable autonumbering.
Defining the Appearance of Notes, Tips, Cautions, and Warnings
If you have the word note, tip, caution, or warning at the start of the paragraph, and the paragraph is defined with a hanging indent, increase the Left margin property in ePublisher to correctly align the word with the appropriate paragraph styles. ePublisher uses the Left margin property to define the hanging indent margin. It also uses the Text Indent property to place the first line of the paragraph to the left of the rest of the paragraph. For instructions on changing the handing indent, see Fixing Paragraph Indentation Including Hanging Indent.
You may want to add an image to the left of each note, caution, tip, or warning in your generated output. ePublisher does not use images from Adobe FrameMaker reference pages. You can use the Bullet properties of a paragraph format to insert an image to the left of the paragraph. This process is similar to using an image for the bullet itself.
Defining the Appearance of Bulleted Lists
By default, ePublisher generates output for bulleted lists based on the properties of the content from the original source documents. Some tools use the Symbol or Wingdings font for bullets. These fonts may not be available on all computers, which can cause the bullets in your output to not be displayed correctly. You can address this issue by using an image for your bullets, or you can create a character style with a font family assigned, such as sans-serif, and then apply that character style through ePublisher to the characters you choose to define for your bullets.
You may also need to increase the left margin of your bulleted list item styles to provide the correct spacing for the bullet and to allow the text to be properly aligned. In addition, you may need to adjust the left margins of both bulleted and numbered list items to get them to line up with each other. This alignment can reduce the number of vertical columns on a page, which can help the user scan the information. This alignment can also let you use the same paragraph formats for paragraphs within either a bulleted or numbered list. For more information about additional margin adjustments, see Fixing Paragraph Indentation Including Hanging Indent.
To create custom bullets
- Open your Stationery design project.
- On the View menu, click Style Designer.
- On the Project menu, click a target in the Active Target menu option that is an output format that supports this option.
- In Paragraph Styles, select the style you want to modify.
- On the Properties tab, click Bullet.
- If you want to create a custom bullet based on an image, complete the following steps:
- Make sure the image you want to use as your bullet image is stored in the Files folder in your project. You can copy the image file to this folder.
- In the Image field under Bullet Info, select the image you want to use.
- If you want to create a custom bullet based on a special character, complete the following steps:
- In the Text field, type the special character you want to use. You can type a special character using the Windows Alt key code.
- In the Separator field, type the separator characters, such as a non-breaking space, that you would like to use between the bullet and the beginning of the first line of text.
- In the Character Style field, select the defined character style you want to apply to the special character specified in the Text field. You can specify any character style that already exists in your project. The character style should use a font available on your users' computers. Avoid custom fonts, which can cause bullet characters to be displayed differently on various computers.
Defining the Appearance of Numbered Lists
When you define the appearance of numbered list items, you need to define margins that leave the correct alignment for the numbers and the hanging indent. Since numbered items have a hanging indent, ePublisher uses a table in the generated output to create the appropriate format. Increase the Left margin property in ePublisher to correctly align the the hanging indented text. Then, set the Flow Indent text property for the paragraph to a negative value to leave enough space for double-digit numbered steps. For example, if your standard paragraph Left margin property is 30 pixels, you may want to set the Left margin property for your numbered list items to 70 pixels and set the Flow Indent text property to -30 pixels for your numbered list items. For instructions on changing the handing indent, see Fixing Paragraph Indentation Including Hanging Indent.
You may also need to work with the left margins of both bulleted and numbered list items to get them to line up with each other. This alignment can reduce the number of vertical columns on a page, which can help the user scan the information. This alignment can also allow you to use the same paragraph formats for paragraphs within either a bulleted or numbered list.
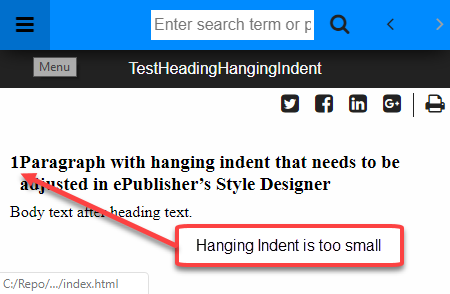
Fixing Paragraph Indentation Including Hanging Indent
It is very common to create paragraphs that use a hanging indent to offset the first line to the left of the rest of the paragraph. This can occur with headings, numbered lists, bulleted lists, and any other paragraph type.
The following figure shows a heading paragraph that has a hanging indent that is not large enough in the generated output. Also, notice that there is not enough white space between the auto-number and the paragraph text.
Using ePublisher's Paragraph Style Designer it is easy to increase the size of the hanging indent and thus increase the amount of white space between the auto-number and the paragraph text.
Steps for chaning the Hanging Indent
- Open the Stationery Design project.
- On the View menu, click Style Designer.
- On the Project menu, click a target in the Active Target menu option that is an output format that supports the Margin Left and Text Ident properties.
- In Paragraph Styles, select the style you want to modify.
- On the Properties tab, click the name of the paragraph style to modify.
- Select Margin and then for the Left, specify a value with units.
- Select Text and then for the Flow Indent, specify the same value with units. However, the value must be the negative of that used for the Margin Left.
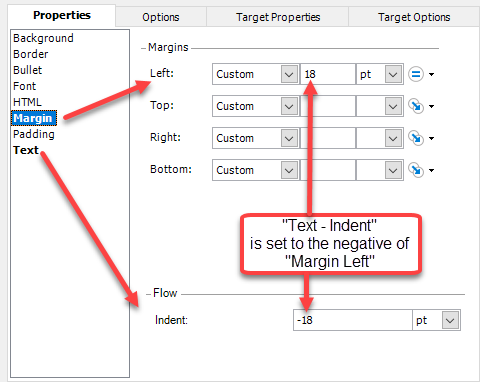
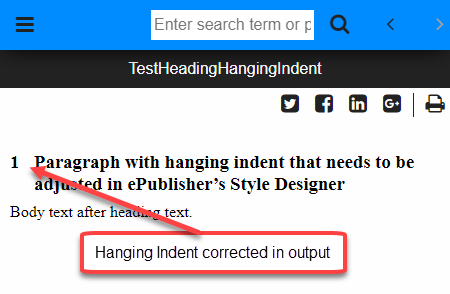
You may want to experiment with different values until you get something that looks good in the output. When generated it will look similar to the updated output shown below.
Last modified date: 06/23/2026